
Set up check-in form: Guest data, fields, and redirect
All settings of your check-in template: Mandatory information per guest, ID number, number of guests, custom fields, uploads, time windows, and redirect.
Updated on November 12, 2026
You open every check-in template under Checkin / Guest Registration, tab Forms. At the top are the tabs Home, Guest data, ID & rules, Payment & extras, Finish, Languages, and Appearance. On Home, the Guest flow shows all steps of your guest; a tap on a step jumps to its settings. Preview opens the form in its own tab.
Guest data: what you need from whom
In the Guest data tab, under required information, separately for the main guest and for additional guests, you set which details are mandatory: First name, last name, gender, date of birth, email, phone, nationality, country of residence, street, ZIP, city, ID/Passport Number, and ID valid until.
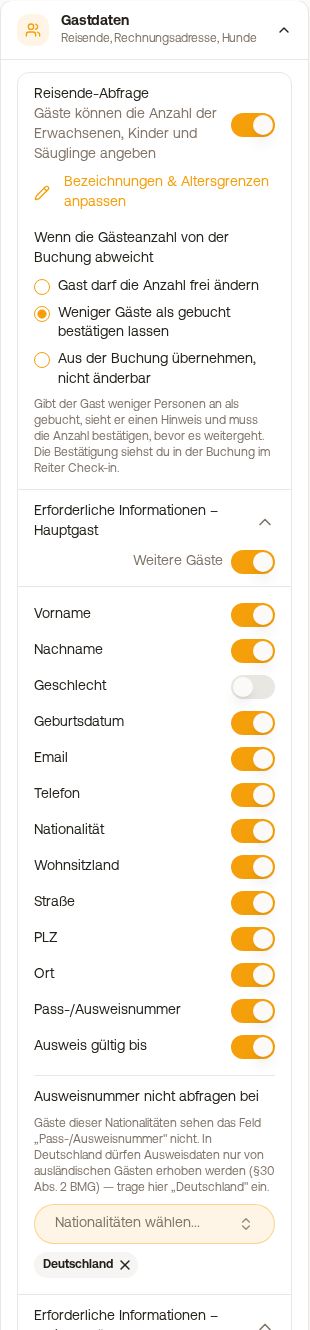 Guest data area with required information and traveler query
- ID number from foreign guests only: Under Do not ask for ID number from, you enter "Germany", for example. In Germany, ID data may only be collected from foreign guests. The rule applies per person: In a mixed group, only those affected are asked. For it to work, nationality must be requested.
- ID valid until is only transmitted to the registration authority together with the ID number. Therefore, switch both on together.
- If you turn off the ID number later, already collected numbers are retained; only no new ones are added.
- For units with guest registration, Xentra automatically sets the fields required by your authority to mandatory.
Travelers and number of guests
How the guest indicates who is arriving, and what applies if the number differs from the booking: see "Check-in form: Travelers and number of guests".
Appearance: Cover image, color, and logo
In the template editor, there is the Appearance tab. There you choose accent color and font, whether your logo appears, and a Cover image for the header of the form. If you do not upload a cover image, every guest sees the photo of their own unit at the top (the image of the unit under Units). So you do not need a separate template for a custom image per apartment: leave the cover image blank and add the matching photo to each unit. An uploaded cover image applies to all units of this template.
Questions for the guest and custom fields
In the Guest data tab, Questions for the guest shows suggestions as your guest reads them, with an example answer and sorted by the step in which they are asked (for example arrival time, flight number, parking, license plate, departure time, house rules, privacy policy). A tap on a suggestion adds the question. Below it are your questions, grouped by "Asked in step...". Via Add custom field, you create a new one. Every new template already contains the newsletter question, voluntary and without preselection; you can remove it like any question.
The Save changes bar holds back every change in the editor, including extra services: Save applies them, Discard takes them back. Above the tabs, a step bar on every tab shows your guest's flow; the steps of the open tab are highlighted. Field types include text field, selection, Multiple choice, Yes/No, date, time, number, and File upload.
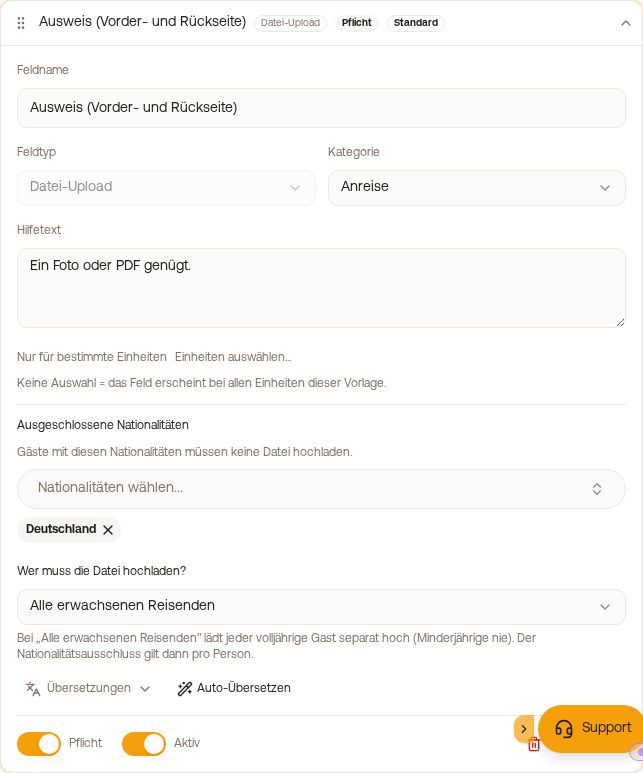 Editing a field: Help text, upload for all adults, and restriction to units
When editing a field, there are:
- Help text: remains permanently under the field, unlike the placeholder.
- Only for certain units: the field only appears for the selected units. No selection means: for all units of the template.
- Limit the selection (for time): "No earlier than the check-in time" or "No later than the check-out time". The times from Access Control → Settings are decisive.
- Who has to upload the file? (for file upload): "Main guest only" or "All adult travelers". With Excluded nationalities, a German guest does not have to upload anything, for example. Both are only available for fields starting from the Arrival category: If a field is in Guest information, the nationality is not yet known. Then set the Category to Arrival.
- Translations with Auto-Translate.
House rules, privacy policy, and newsletter
You maintain the texts in the ID & rules tab. The guest confirms house rules and privacy policy with a check mark; he answers the newsletter consent with Yes or No. Xentra saves consent to the newsletter with a timestamp on the contact. With Translate texts in the Languages tab, you have all texts translated into the activated languages.
Signature and ID verification
In the ID & rules tab under Legal & verification, you turn on the Digital Signature and select in which step it appears. The ID Verification (Stripe Identity) is subject to a fee and is charged per performed check; you can find the current price on the pricing page; more on this in the article ID data in online check-in: what Xentra stores.
Redirect after submitting
In the Finish tab under Redirect after check-in, you turn on Forward after check-in and select Guest guide of this unit or Custom website. Without a redirect, the guest sees your confirmation message.
Custom check-in system
If you use another provider for check-in, turn on the Ind. Checkin System module in the Module Overview (in the Pro plan). In the Forms tab, Who runs the online check-in? then appears at the top: There you select Your own system, enter the Base URL, and determine which identifier is attached to the booking. In messages, you then use {{external_checkin_link}}.