
Set up Smoobu: register new API key with secret and webhook
How to switch Smoobu to the new API key with secret, fix "API key invalid", and enter the Xentra webhook in Smoobu.
Updated on November 12, 2026
Smoobu logs in programs like Xentra with an API key and a secret. Smoobu has deprecated the classic login using only the old API key: a connection still using the old key will no longer receive bookings, availabilities, and messages as soon as Smoobu turns it off. The connection does not switch over automatically: you enter the new credentials once.
Which one do I use? Open PMS & iCal. If your connection is on the card Smoobu (Legacy), it is still using the old key. On the card Smoobu, it is already converted.
Generate new credentials in Smoobu
- In the Xentra connection dialog, click "To Smoobu API Keys Page" at the bottom. The link opens the correct page directly in Smoobu (in Smoobu: Settings → Advanced Settings → API Keys).
- Open the "New API keys" tab there and click "Create New".
- Smoobu then displays two values: at the top the API key, which always starts with
usr_live_(above it in the German interface it says "Label"), below it the secret (in the German interface "Security"). Smoobu shows the secret only a single time: copy both values before you close the window.
Convert existing connection
- Open PMS & iCal and click Settings on your connection on the Smoobu (Legacy) card.
- Select "Change API key" at the bottom.
- Enter the API key (
usr_live_…) in the top field, and the secret in the "API secret" field below it. Make sure not to copy spaces at the start or end. - Test connection, then Save connection.
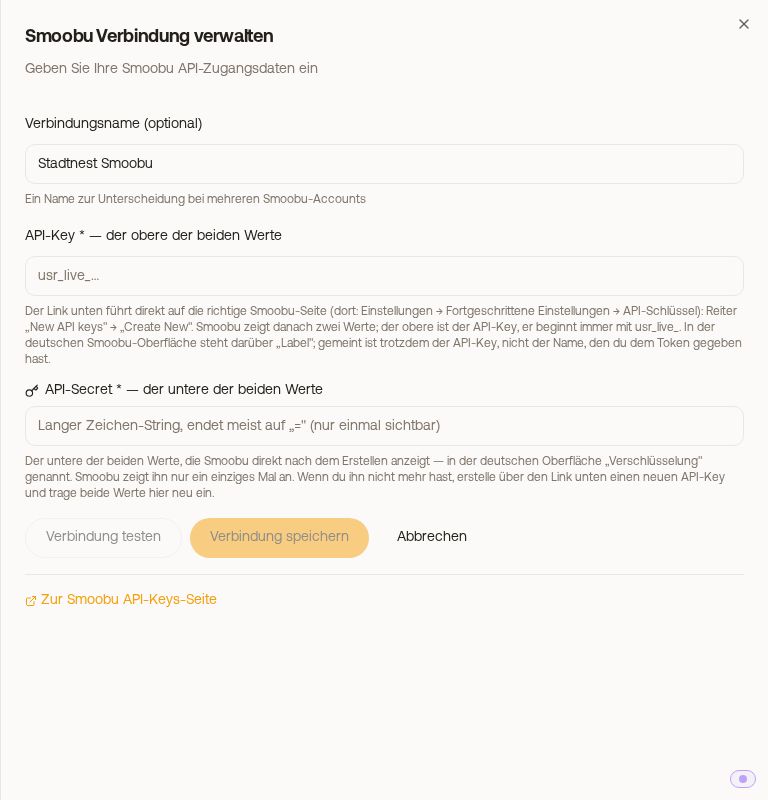 The fields for API key and API secret with the link to the Smoobu API Keys Page
After that, your connection moves from the "Smoobu (Legacy)" card to the "Smoobu" card. Mappings, bookings, automations, and the webhook remain intact: nothing is re-imported and no second connection is created, only the login changes.
Alternatively, you can use Connect on the Smoobu card: Xentra recognizes your Smoobu account and converts the existing connection instead of creating a second one.
If you leave the secret field empty, the connection stays on the old key that Smoobu has deprecated.
Connect a second Smoobu account
If you have two Smoobu contracts (for example a business and a private account), you can connect both under one Xentra login.
- Open PMS & iCal.
- On the Smoobu card, click Connect Another Account next to your connected account (on mobile, the +).
- Under Connection name, enter a name to distinguish the accounts, then enter the API key and API secret of the second account, click Test connection, and Save connection.
- Map the apartments of the second account to your units in its Property mapping.
Xentra sets up the webhook for each account automatically (see below). Messages and booking data always go through the account to which the booking belongs.
The button only appears on the Smoobu card. If your first account still runs on the Smoobu (Legacy) card, convert it first as described above.
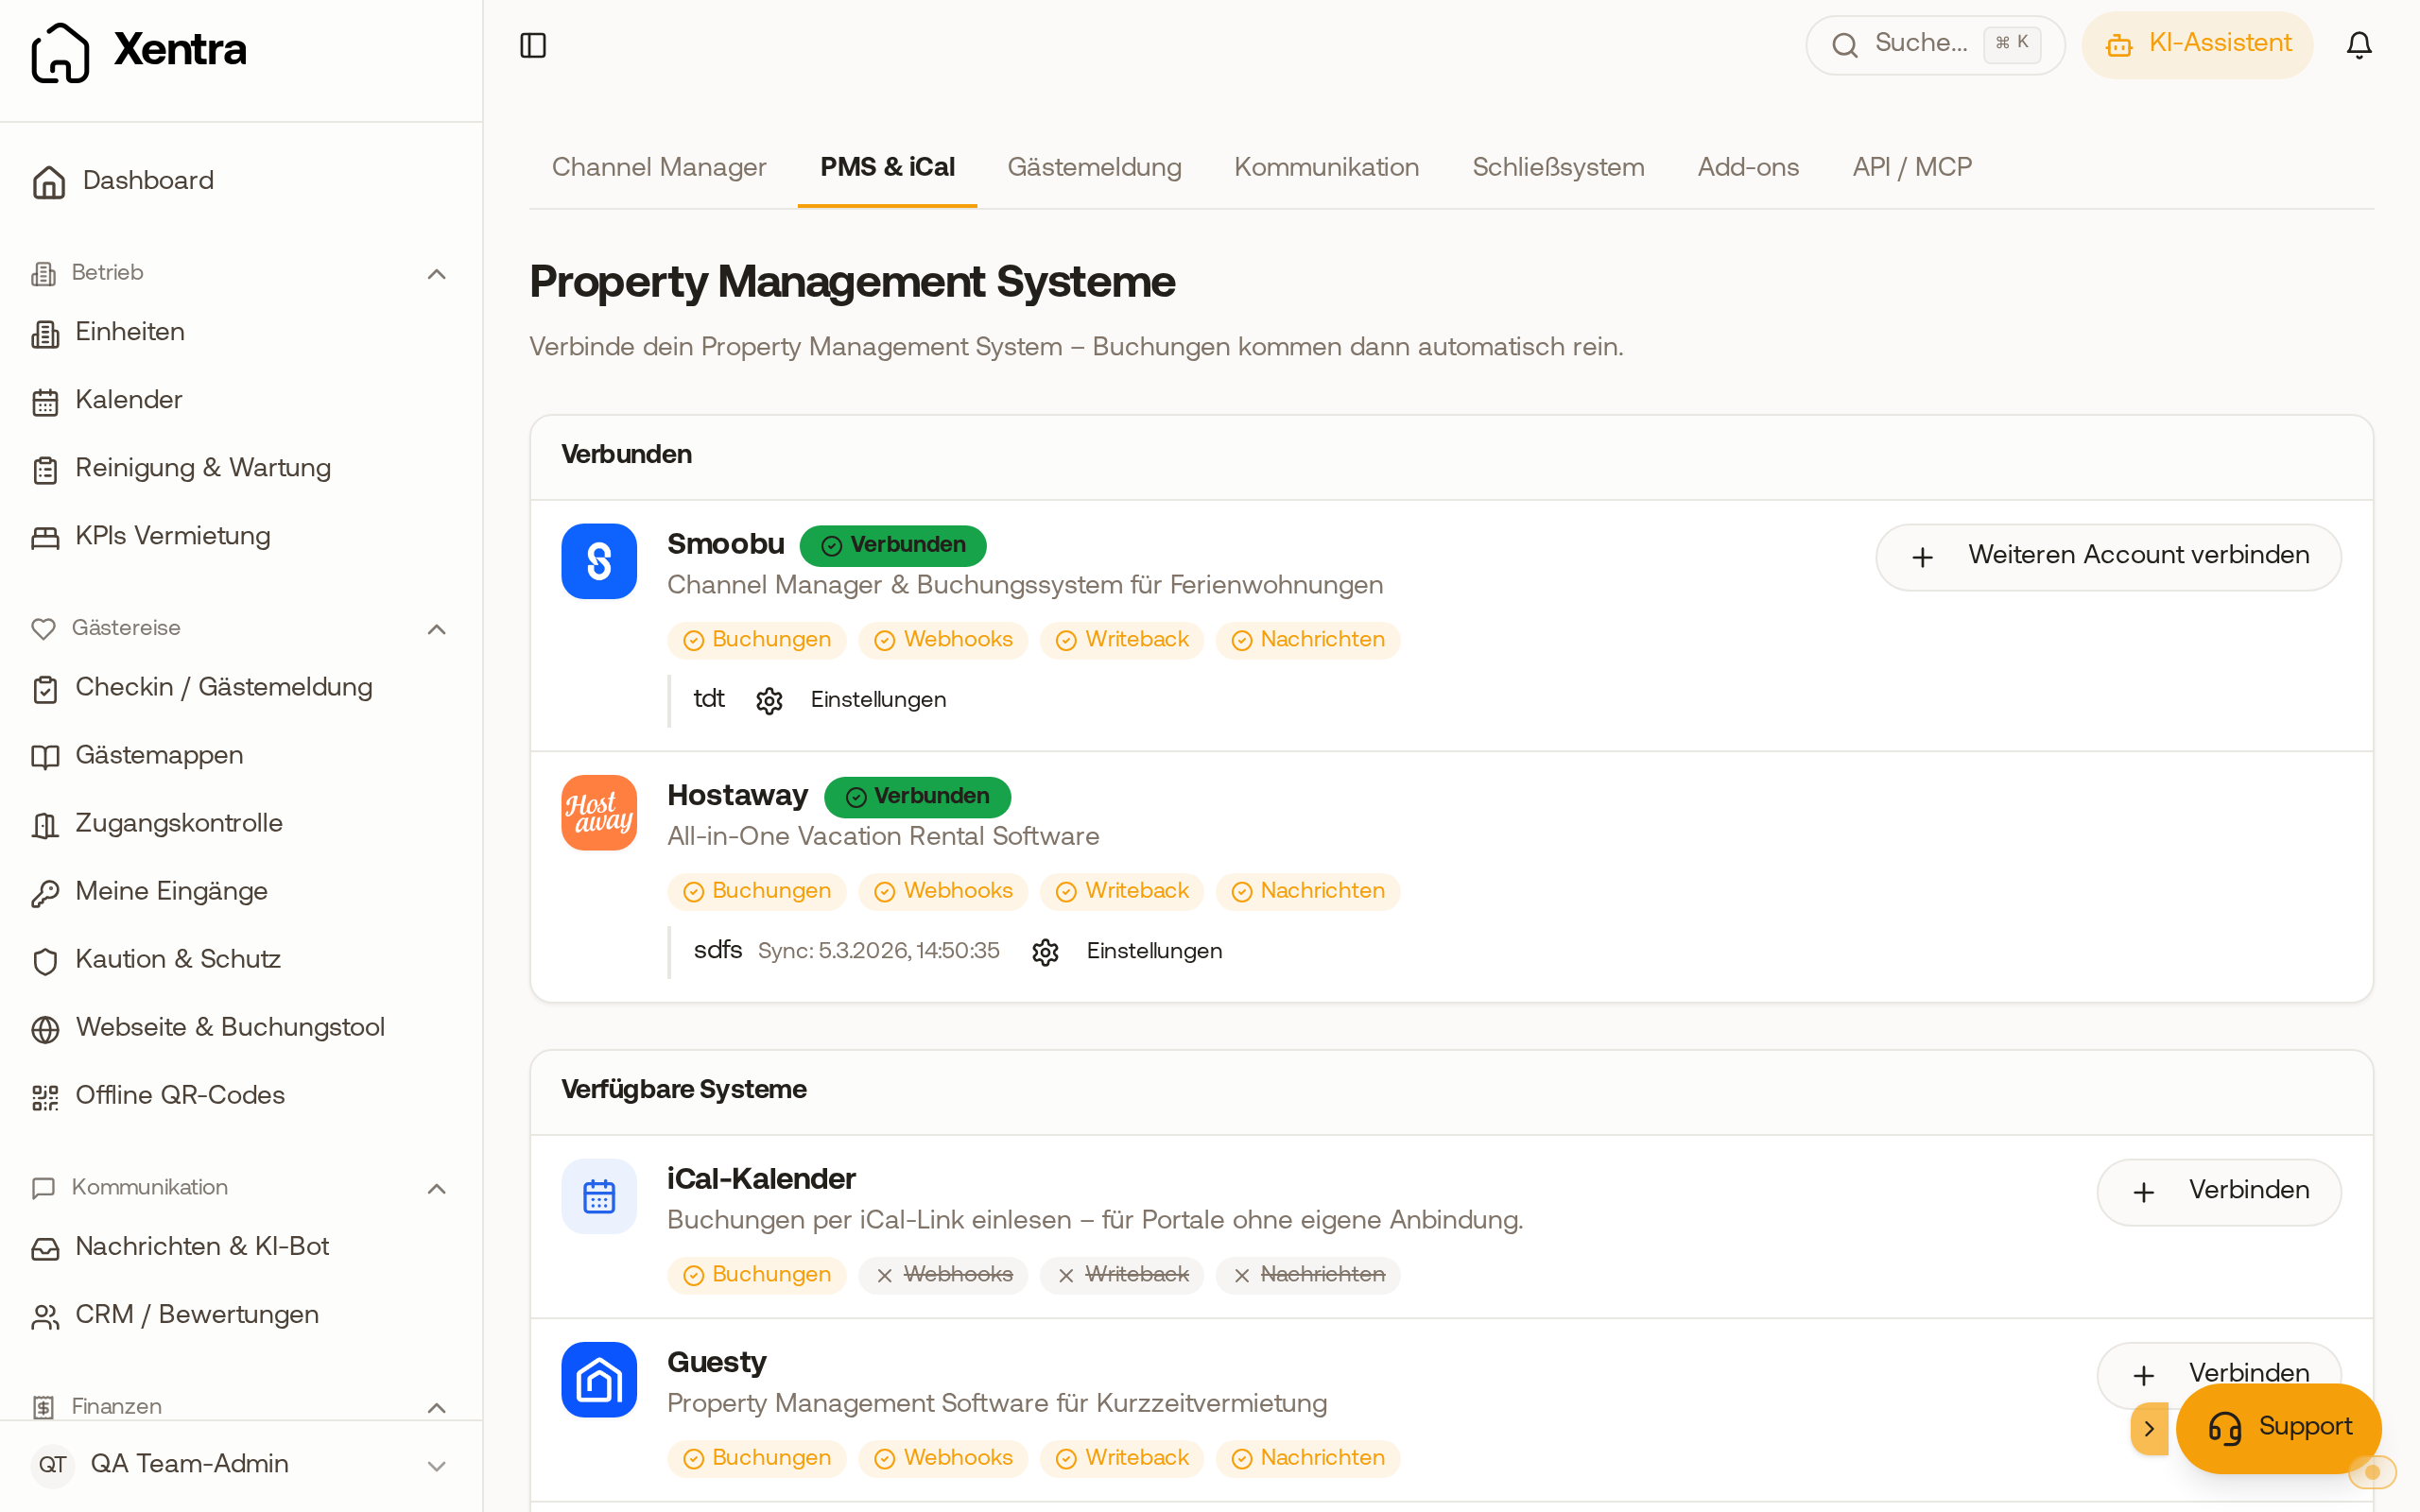 On the Smoobu card, the "Connect Another Account" button is located next to the connected account.
"API key invalid"
Almost always, the secret is missing. A new usr_live_ key only works together with the secret that Smoobu displayed below it when creating it. Enter both values. If you no longer have the secret, create a new API key in Smoobu and adopt both values this time.
What the webhook is for
The Smoobu connection has two parts:
- API connection (set up in Xentra): Xentra fetches bookings and messages regularly from Smoobu, about every 15 minutes.
- Webhook (entered in Smoobu): Smoobu reports new bookings immediately to Xentra instead of waiting for the next fetch.
Without the webhook, the connection still works, but bookings only arrive with the next fetch.
Webhook: set up automatically by Xentra
With the new API key and secret, Xentra registers the webhook with Smoobu automatically when saving. The connection dialog then states: "Xentra has automatically set up the webhook in your Smoobu account. Do not enter the address additionally in Smoobu, otherwise every booking and message will arrive twice."
Only if that did not work, the dialog shows the field "Webhook URL (for real-time updates)". Then you enter it manually like this:
- In Xentra, open PMS & iCal and open your Smoobu connection via Settings.
- In the "Webhook URL (for real-time updates)" field, copy the address using the copy button next to it.
- In Smoobu under Settings → Webhooks, create a new webhook, paste the address, and save.
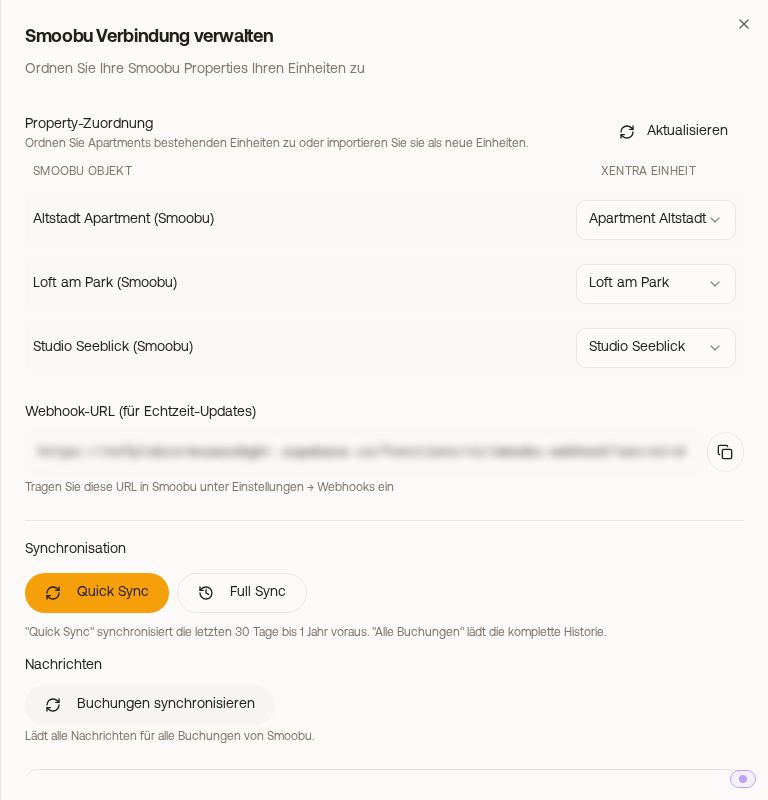 The "Webhook URL (for real-time updates)" field in the Smoobu connection
When switching to the new credentials, Xentra also sets up the webhook automatically if none arrived so far. Xentra leaves a webhook alone that you have already entered manually and that is working.
Import new units from Smoobu
If you create a new apartment in Smoobu, it does not automatically come to Xentra as a unit. Open your Smoobu connection under Integrations, PMS & iCal and click Refresh under "Property mapping". The new apartment then appears in the list: map it to an existing unit or create it using "Import as new unit".
Troubleshooting
If a new Smoobu booking arrives after minutes instead of seconds, the webhook is usually missing: open the connection. If the "Webhook URL" field is listed there, check whether the address is correctly saved in Smoobu under Settings → Webhooks. If a booking is missing completely, start Quick Sync in the connection.
If no bookings arrive at all anymore and your connection is still on the Smoobu (Legacy) card, it is still running on the old key: convert it as described above.